
Category


Photos are for informational purposes only. View product specification
please use latin characters
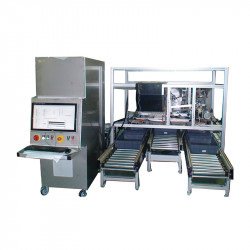
Tester for vision testing of piston rods, gas springs with diameters of 6, 8, 10, 14 mm and lengths from 50 to 550 mm.
Technical data
| Vision system | |
| Tested piston rods | Ø6, Ø8, Ø10, Ø14 mm |
| Power supply |
230 VAC, 50 Hz |
| Power supply tolerance | +10% ÷ -10% |
| Power connection | 3 x 4 mm² |
| Maximum main current | ≤ 20 A |
| Output power | 2 kW |
| Piston rod length | 50 ÷ 550 mm |
| Surface layer hardness |
HV0,1 ≥ 550 |
| Color |
gray-black |
| Roughness | max. Ra0,1 (after polishing) |
| Maximum number of simultaneously tested piston rods | 10 pcs. |
| Number of measuring fields |
10 pcs. |
| Cycle of work |
every 6 seconds - piston rod 250 mm |
| Pressure connection | 6 atm, pipe Ø8mm |
| Operating mode |
24 h/day |
| Environmental conditions | operating temperature: 10 °C ÷ 35 °C humidity: 10% ÷ 75% |
| Dimensions of the control cabinet (H x W x D) |
1727 x 600 x 1532 [mm] |
| Overall dimensions with polisher and feeders (H x W x D) |
1800 x 4508 x 4210 [mm] |
| Feeders |
|
| Number of feeders |
2 pcs. |
| Power supply |
from the vision system control cabinet |
| Connection of pneumatics |
from vision system |
| Number of piston rods in the feeder |
approx. 400 pcs. Ø8 |
| Maximum piston rod length |
550 mm |
| Polisher |
|
| Polisher symbol |
LMCL-01 |
| Power supply |
3x400 VAC |
| Type of polisher |
centreless for steel round shafts |
| Tape |
polishing with abrasive belts (dry, recommended belt length - 3000 mm) |
| Body |
provides vibration elimination and dimensional accuracy |
| Roller feed |
by means of clamping of an angled rubber roller |
| Loading workpieces for polishing | from the automatic feeder |
| Adjustments for changing process parameters | feed rollers, centering, camber, clamping |
| Speed |
approx. 2-5 m/min |
Are you interested in this product? Do you need additional information or individual pricing?
Tester for vision testing of piston rods, gas springs with diameters of 6, 8, 10, 14 mm and lengths from 50 to 550 mm.
Technical data
| Vision system | |
| Tested piston rods | Ø6, Ø8, Ø10, Ø14 mm |
| Power supply |
230 VAC, 50 Hz |
| Power supply tolerance | +10% ÷ -10% |
| Power connection | 3 x 4 mm² |
| Maximum main current | ≤ 20 A |
| Output power | 2 kW |
| Piston rod length | 50 ÷ 550 mm |
| Surface layer hardness |
HV0,1 ≥ 550 |
| Color |
gray-black |
| Roughness | max. Ra0,1 (after polishing) |
| Maximum number of simultaneously tested piston rods | 10 pcs. |
| Number of measuring fields |
10 pcs. |
| Cycle of work |
every 6 seconds - piston rod 250 mm |
| Pressure connection | 6 atm, pipe Ø8mm |
| Operating mode |
24 h/day |
| Environmental conditions | operating temperature: 10 °C ÷ 35 °C humidity: 10% ÷ 75% |
| Dimensions of the control cabinet (H x W x D) |
1727 x 600 x 1532 [mm] |
| Overall dimensions with polisher and feeders (H x W x D) |
1800 x 4508 x 4210 [mm] |
| Feeders |
|
| Number of feeders |
2 pcs. |
| Power supply |
from the vision system control cabinet |
| Connection of pneumatics |
from vision system |
| Number of piston rods in the feeder |
approx. 400 pcs. Ø8 |
| Maximum piston rod length |
550 mm |
| Polisher |
|
| Polisher symbol |
LMCL-01 |
| Power supply |
3x400 VAC |
| Type of polisher |
centreless for steel round shafts |
| Tape |
polishing with abrasive belts (dry, recommended belt length - 3000 mm) |
| Body |
provides vibration elimination and dimensional accuracy |
| Roller feed |
by means of clamping of an angled rubber roller |
| Loading workpieces for polishing | from the automatic feeder |
| Adjustments for changing process parameters | feed rollers, centering, camber, clamping |
| Speed |
approx. 2-5 m/min |
Your review appreciation cannot be sent
Report comment
Report sent
Your report cannot be sent
Write your review
Review sent
Your review cannot be sent
