
trebuie să fii logat
Category

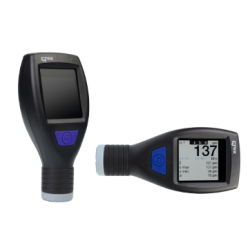

Fotografiile au doar scop informativ. Vizualizați specificațiile produsului
please use latin characters
Rethinking coating thickness measurement QUALITY
With more than 100 measurements per minute, in terms of speed the QNix® 4600 can easily keep up with its measuring objects. Thanks to the handy and ergonomic design, the QNix® 4600 is in the vehicle appraisal in pole position.
The quick inspection of the paintwork succeeds reliably and accurately with the practical one-button operation. Without complex device configuration the QNix® 4600 provides precise measurement results.
Switch on, put on, read off. The large contact surface and the low centre of gravity ensure a safe placement and avoid incorrect measurements.
Whether it's powder coating or wet painting, the QNix® 4600 performs in the field of industrial painting and vehicle appraisal.
The brilliant 2" large colour LCD of the QNix® 4600 with its automatically flipping display makes readings of the measured values easier in any situation – even in low light conditions. The indication of average, standard deviation as well as the highest and lowest measured value provides all the necessary statistical information to the current series of measurements.
QNix® 4600 The Coating Thickness Gauge
TIME SAVING AND EASY OPERATION
RELIABILITY OF VALUES THROUGH PRECISION AND CORRECTNESS
PROCESS RELIABILITY AND READABILITY
QNix® 4600 Scope of supply
Scope of supply of the QNix® 4600 Optional with Fe or Dual probe
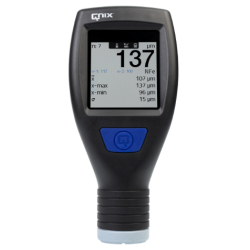
QNix® 4600 with automatically flipping display
Bright, 2" large colour display for an easy reading even under low light conditions
Measured value of the coating thickness in μm or mil
Average value
Maximum measured value of the current series of measurements
Minimum measured value of the current series of measurements
Standard deviation
Easy to use by one button
Large contact surface for a stable placement to avoid incorrect measurements
Automatically flipping display
Electrical details
| Power supply | 2 × AA (batteries or rechargeable batteries) |
| Battery life when gauge is not in use at min. 50 % battery capacity | > 1 year |
| Battery life at one measurement per second | up to 40.000 readings |
| Display | IPS-LCD, 2", colour, 350 cd / m2, viewing angle 70° all directions |
Weight and dimensions
| Dimensions (H x W x D) | 135 × 63 × 43 mm |
| Weight | 100 g |
Environmental conditions
| Operating temperature | 0 °C to +50 °C / 32 °F to 122 °F |
| Storage temperature | -20 °C to +70 °C / -4 °F to 158 °F |
| Climatic conditions | 10 to 90 % relative humidity, non-condensing |
Metrological characteristics
| Measuring principle | magnetic: magnetic field amendment / hall-effect Fe / eddy-current NFe |
| Measuring speed (measurements per minute) | ≥ 100 |
| Accuracy of measurement on Fe substrates related to QNix® reference standards | ± (1 μm + 2 % of the reading) to 2,0 mm ± 5 % of the reading from 2,0 mm |
| Accuracy of measurement on NFe substrates related to QNix® reference standards | ± (2 μm + 2 % of the reading) to 2,0 mm ± 5 % of the reading from 2,0 mm |
| Smallest measuring surface Fe / NFe | diameter 28 mm |
| Smallest curvature konvex Fe | 10 mm – Zero point adjustment on original substrate (accuracy checked up to 250 μm) |
| Smallest curvature konvex NFe | 50 mm – Zero point adjustment on original substrate (accuracy checked up to 250 μm) |
| Minimum thickness of base metal Fe | 100 μm – Zero point adjustment on original substrate (accuracy checked up to 250 μm) |
| Minimum thickness of base metal NFe | 50 μm – Zero point adjustment on original substrate (accuracy checked up to 250 μm) |
Sunteți interesat de acest produs? Aveți nevoie de informații suplimentare sau de prețuri individuale?
trebuie să fii logat
Rethinking coating thickness measurement QUALITY
With more than 100 measurements per minute, in terms of speed the QNix® 4600 can easily keep up with its measuring objects. Thanks to the handy and ergonomic design, the QNix® 4600 is in the vehicle appraisal in pole position.
The quick inspection of the paintwork succeeds reliably and accurately with the practical one-button operation. Without complex device configuration the QNix® 4600 provides precise measurement results.
Switch on, put on, read off. The large contact surface and the low centre of gravity ensure a safe placement and avoid incorrect measurements.
Whether it's powder coating or wet painting, the QNix® 4600 performs in the field of industrial painting and vehicle appraisal.
The brilliant 2" large colour LCD of the QNix® 4600 with its automatically flipping display makes readings of the measured values easier in any situation – even in low light conditions. The indication of average, standard deviation as well as the highest and lowest measured value provides all the necessary statistical information to the current series of measurements.
QNix® 4600 The Coating Thickness Gauge
TIME SAVING AND EASY OPERATION
RELIABILITY OF VALUES THROUGH PRECISION AND CORRECTNESS
PROCESS RELIABILITY AND READABILITY
QNix® 4600 Scope of supply
Scope of supply of the QNix® 4600 Optional with Fe or Dual probe
QNix® 4600 with automatically flipping display
Bright, 2" large colour display for an easy reading even under low light conditions
Measured value of the coating thickness in μm or mil
Average value
Maximum measured value of the current series of measurements
Minimum measured value of the current series of measurements
Standard deviation
Easy to use by one button
Large contact surface for a stable placement to avoid incorrect measurements
Automatically flipping display
Electrical details
| Power supply | 2 × AA (batteries or rechargeable batteries) |
| Battery life when gauge is not in use at min. 50 % battery capacity | > 1 year |
| Battery life at one measurement per second | up to 40.000 readings |
| Display | IPS-LCD, 2", colour, 350 cd / m2, viewing angle 70° all directions |
Weight and dimensions
| Dimensions (H x W x D) | 135 × 63 × 43 mm |
| Weight | 100 g |
Environmental conditions
| Operating temperature | 0 °C to +50 °C / 32 °F to 122 °F |
| Storage temperature | -20 °C to +70 °C / -4 °F to 158 °F |
| Climatic conditions | 10 to 90 % relative humidity, non-condensing |
Metrological characteristics
| Measuring principle | magnetic: magnetic field amendment / hall-effect Fe / eddy-current NFe |
| Measuring speed (measurements per minute) | ≥ 100 |
| Accuracy of measurement on Fe substrates related to QNix® reference standards | ± (1 μm + 2 % of the reading) to 2,0 mm ± 5 % of the reading from 2,0 mm |
| Accuracy of measurement on NFe substrates related to QNix® reference standards | ± (2 μm + 2 % of the reading) to 2,0 mm ± 5 % of the reading from 2,0 mm |
| Smallest measuring surface Fe / NFe | diameter 28 mm |
| Smallest curvature konvex Fe | 10 mm – Zero point adjustment on original substrate (accuracy checked up to 250 μm) |
| Smallest curvature konvex NFe | 50 mm – Zero point adjustment on original substrate (accuracy checked up to 250 μm) |
| Minimum thickness of base metal Fe | 100 μm – Zero point adjustment on original substrate (accuracy checked up to 250 μm) |
| Minimum thickness of base metal NFe | 50 μm – Zero point adjustment on original substrate (accuracy checked up to 250 μm) |
Aprecierea ta pentru recenzie nu a putut fi trimisa
Reclama un comentariu
Raport trimis
Reclamatia tau nu a putut fi trimisa
Scrie-ti recenzia
Recenzia a fost trimisa
Recenzia ta nu a putut fi trimisa
